I felt lucky, once we’d put a few miles on the bus, that we didn’t have any overheating issues – a common problem on the old MCI with a DD two-stroke engine. However, the bus was really slow then, so when I finally got the throttle problem ironed out and we could (sort of) keep up with the big dogs we found out we could overheat if we pushed it too hard in hot weather. Runnin’ ‘pedal to the metal’ was not an option now. I’d also been refilling the fan blower gear box nearly every day as all three shaft seals leaked gear oil down all over the top of the engine. Besides these issues, the radiators were an unknown and that can lead to very unpleasant surprises. The system was underperforming, leaking and old so I decided it was time to rehab it all.
After we got back from our trip out east I told Wendy the bus would be ‘down’ for some time while I tore into the cooling system. I’d been contemplating this (and hesitating) for quite some time because (silly me) I could not figure out how the thing came apart? I’d looked at it carefully several times and could not believe the conclusion I returned to each time! A quick post to the bus forum fast revealed – to my horror – I was right. The whole contraption – fan blower gear box, shafts, fans and shrouds had to come out the back of the bus – all in one piece! Crazy! Who dreamed this up?
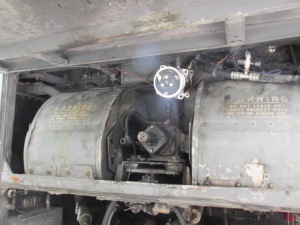
An added complication for me came in the form of an automotive type A/C compressor I had mounted on top of it all in order to resurrect the Driver/Passenger A/C system. I did not want to disconnect that compressor! I’d finally got all the refrigerant leaks plugged and it was working! So, I unbolted the compressor and wired it up (I hoped) out of the way.
A/C compressor, I hope, is up out of the way. Can you believe this whole assembly has to come out in one piece!
Once everything is unbolted, for sure it does not look possible, and if you just try to lift and pull it is not possible. The trick I learned after much banging, pinching and gnashing is to rotate the shrouds around the fans inside the bay and get the trailing edge hooked over the top of the lower beam of the bay. At that point, you can just rotate both shrouds simultaneously and the whole loose, heavy mess just pops out! You better have it chained to a cherry picker or have some strong arms at ready – this thing is heavy and awkward. It’s a dirty job, too!
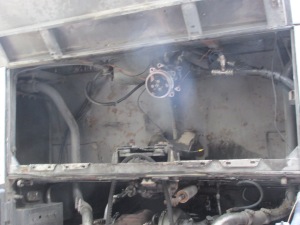
Here’s the assembly resting on the floor of my shop and anther shot of the empty coolant bay.
The shrouds will now slide off revealing the squirrel cage fans, but all of the gear pullers I had failed to pull those fans from the tapered shafts of the blower gear box. I had to take it all out to a truck repair shop to get them separated.
The next step was to pull those old radiators, but I had to take the corners off the bus first!
Besides being dirty, they looked to be in fairly good condition, but those shutters were inoperable and they had to come off. Everyone I asked said to just toss them as they are unnecessary for a converted bus.
Here’s a shot of the passenger side radiator just after removal. The radiators are also very heavy (even drained), but I was able to wrestle them out and (just barely) set them on the ground. I took them to a local radiator shop that ‘rodded’ them out and threw a little black paint at them. Again, good fortune! They were starting to get a little restricted, but were in good shape otherwise. They flow and pressure tested and said I was good to go.
It took me a couple of days to clean up the 30+ year old mix of dirt, grease and mud in the coolant bay.
That’s mostly it for the destruction phase. Next time I’ll start recon.


Now I know why I got my little Casita….wow…good luck …I would enlist Bob to do the “Grunt Work”…haha…Horst sends